


Document Actions
gvSIG-Desktop 1.9 Alpha. Manual de usuario.
(The clipping tool can be accessed from the raster toolbar by selecting "export to raster" from the left drop-down button and "Clipping" from the drop-down button on the right. Make sure that the raster layer that you want to clip is set as the current layer in the text box.)
With the clipping tool, you can create new layers from an existing one. The options are:
- Extract an area from the input image to be saved as a new layer (cropping)
- Modify the resolution through various interpolation methods
- Modify the order or the number of bands
- Separate the bands into multiple files
Selection of the clipping area
In the "Coordinates" tab of the clipping dialog, there are text boxes to enter coordinates. In the upper part are the values in pixel coordinates and in the lower part the real coordinates. For each item, the two upper text boxes correspond to the coordinates of the upper left corner, while the lower two text boxes correspond to the lower right corner. When changing the pixel coordinates, the real coordinates are re-calculated automatically and vice versa.
There are 3 selection methods that will fill the coordinates automatically. These methods can be activated by clicking the buttons on the bottom of the clipping dialog. From right to left, the buttons are:
- "Select from the view". This is the most commonly used tool to clip a layer. After clicking this button you can draw a rectangle over the view to select the portion of the input layer to be saved as a new layer.
- "Full Extent of the raster layer" When clicking this button, the coordinates of the upper left and lower right corner of the input image are filled in the text boxes.
- "Fit to the maximum extent of the ROIs of the layer". When clicking this button, the extent of the area covered by the ROIs associated with the layer is calculated, and the coordinates are filled in the text boxes.
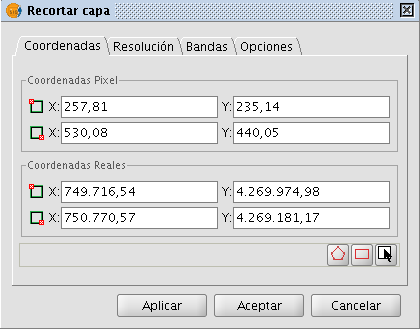
Clipping dialog. Coordinates tab
Modifying the resolution
In the "Spatial resolution" tab of the Clipping dialog, you can modify the resolution of an output image through various interpolation methods. There are two option boxes located on the upper part of this tab:
- Cell size: Ticking this option will activate the text box labeled "Cell", where you can introduce the new cell size value. By default, the text box shows the cell size of the input image.
- Width x Height: Ticking this option will activate the text boxes labeled "Width" and "Height" where you can introduce the desired width and height of the output image. When changing the width, the height will be re-calculated automatically and vice versa to maintain the correct proportions of the selected area.
When modifying the resolution it is necessary to resample and re-assign the pixel values for the output image through an interpolation method. There are four interpolation methods available: Nearest neighbour, Bilinear, inverse distance and B-Spline. The nearest neighbor is the fastest interpolation method, but the results in pixilation of the image and a lower visual quality. The other interpolation methods produce a smoother result.
The button labeled "Restore" returns the initial values of the input image.
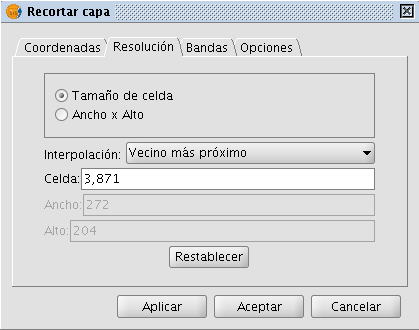
Clipping dialog. Spatial resolution tab
Band selection
The "Bands selection" tab of the Clipping dialog displays a table that lists the bands of the input image. When processed, the output image will have the bands in the order as shown in this list. By default, the output image will have the same order of bands as the input image. The order of the bands can be modified through the "Up" and "Down" buttons. The selected row will go up or down one position in the list. The bands can also be omitted from the resulting image by un-checking the corresponding row.
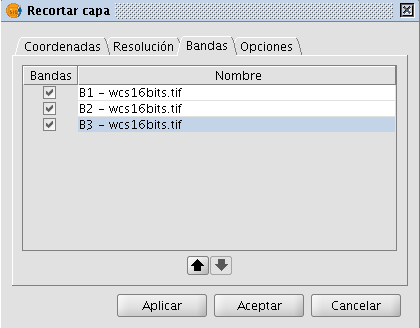
Clipping dialog. Bands selection tab
Selecting Options
The "Options" tab of the Clipping dialog presents various options that can be set by the user:
- Name of the output layer: you can modify the default name in the textbox labeled "Layer names". This is the name that will appear in the TOC and the name of the file that will be saved to disk. In case of several output layers (i.e. when each band is saved as a separate layer), the name will be the same for each layer but with a number at the end (_XXX). For example, if the layer is called NewLayer and there are 3 output layers, the respective layer names will be NewLayer_1.tif, NewLayer_2.tif and NewLayer_3.tif.
- If the check box labeled as "Create a layer for each band" is ticked, a new layer will be created for each band in the input image.
- If the check box labeled as "Save on disk automatically" is ticked, a text box labeled "Directory" will be activated where you can indicate the file path for the output files. If un-checked, the generated output layers are temporary.
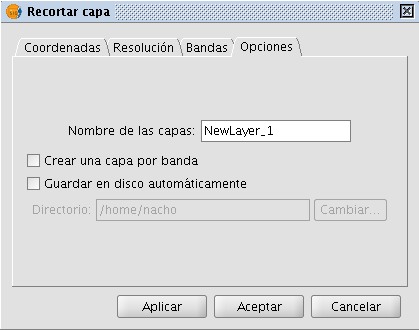
Clipping dialog. Options tab


